{article.name}
Westville Grand Rental Station
Install Ceramic Wall Tile
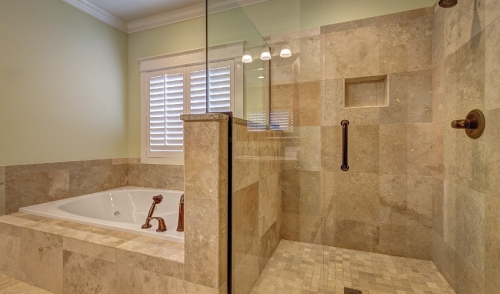
Ceramic tiling looks great behind stoves, framing sinks, surrounding bathtubs and lining shower walls. It's a great decorative accent that is also durable, easy to clean and very practical for surfaces the are exposed to water. There is an array of different tiles available for specific needs so take care when choosing the one that's right for you. So don't base your choice solely on size and color of the tile--you must also consider the tile's location when choosing a material.
Absorption Characteristics
Not all ceramic tiles absorb the same amount of water, so it is important to know which tile is best for certain areas. The most highly absorbent tiles are called nonvitreous tiles, and are not suitable for showers, tubs or sink countertops. Semivitrious tiles are low absorption and can be used near splash areas such as showers and sinks. Impervious tiles will not absorb any moisture, not even dye. They are also good for bathtub and shower areas and kitchen or bathroom countertops. Tiles that are water-resistant are called glazed and tiles that are not water-resistant are called unglazed.
Grout used between the tiles can also have different levels of absorption. The best grout to use on tile that will be exposed to water is a rubber like grout with a silicone or polyurethane base.
Types of Ceramic Tile
A good tile for small areas or curved areas is Mosaic because it is no bigger than 1 to 2-inches squared and as small as 3/8-inch squared. Tiles are usually attached to a mesh sheet and sold in square feet for easy installation. Mosaic tile can be glazed or unglazed, depending on your need.
An unglazed tile that is good for floors and hearths is quarry tile, but it is not water-resistant. Pavers are thick 12-inch squares that are best for patios and outdoor tiling. Marble and granite tiles are good for floor and accent tiles. They cannot be cut with a standard tile cutter, only a water-lubricated power saw.
Tools and Materials you need:
- 1/2-inch cement wallboard or water-resistant wallboard (amount depends on job)
- Circular saw or tile saw (Rental item)
- Galvanized wallboard screws
- Fiberglass tape
- Pencil
- Level
- Tile adhesive (thin set or mastic-type cement)
- Notched trowel
- Tile of choice
- Plumber's putty
- Glass cutter
- Grout
- Rubber-bottom float or sponge
- Sponge
- Caulk
- Utility knife
1. Install Cement Wallboard
Ceramic tile can be installed on just about any clean flat surface, but make sure it can support the weight of the tile. If you have doubts that your surface will support the tile, it is best to install a 1/2-inch cement wallboard before tiling. Cement wallboard is sturdier than most types of wallboard, but still light enough so that it can be installed almost anywhere. Cement wallboard is used mostly when tiling a wall, and is usually not necessary for tiling tubs or sinks since they are supported with plywood. Using a carbide blade or circular saw cut the cement wallboard to fit your area. If you are using mastic-type cement, face the cement wallboard with the smooth side out. Face the textured side out when using a thin-set adhesive. Using a hammer, drive galvanized screws into the wallboard 6 inches apart to fasten.
2. Tape Wallboard Seams
Use the fiberglass tape recommended by the tile manufacturer to tape the board seams and the joints where the cement wallboard meets the original wall. If you are using mastic cement as an adhesive, fill the joints with thin-set adhesive to avoid water damage.
3. Draw Reference Lines
Using a level, draw reference lines over a 3-feet-by-3-feet area. The lines should be horizontal and perpendicular to ensure no tiling errors. Each line must be level and they should look similar to a grid. If you are installing sheets of tile, each reference line will be the length and width of each sheet of tile. These lines will guide you in installing your tile straight.
4. Apply Adhesive
Using a notched trowel spread the adhesive over one square area, not going over the reference lines of that area. Use the flat side of the trowel to apply the adhesive and then use the notched edge of the trowel to form ridges in the adhesive.
5. Press Tiles into Place
Press the tiles or sheet of tiles into place, using spacers between each to keep the grout gaps uniform. After applying each tile or sheet of tile, check if it is straight with a level. Repeat this process until the entire area is tiled.
6. Cutting Tiles
To Fit Around the Soap Dish: If you are tiling a wall in your shower, be sure to leave out enough tiles to attach the soap dish to the wall. Center the soap dish in the open space and cut tiles with a tile cutter to fit on each side of the dish.
To Fit Around Pipes: To tile around pipes and wall mounted faucets, use a pencil to mark the tile where it needs to be cut and break out the marked piece with tile nippers. Smooth the edges with 80-grit sandpaper.
How To Cut Tile: Rent a tile cutter so you can cut the tile in half before nipping out the center to fit the pieces around the pipe.
7. Distribute Grout Over the Tiles
Once all of the tiles are adhered to the area, apply grout. Cover the tiles with grout using a rubber-bottom float or a sponge and wipe on a diagonal. Sweep the float across the tile to remove any excess grout. Remember, if you are tiling a shower or bathtub, make sure the grout includes a waterproofing agent.
8. Fill the Joints With Caulk
If you are tiling a bathtub or shower wall, fill the tub with water so it is heavy enough to pull the tub away from the tile. Using latex or silicone caulk, fill the joint area between the tile and tub. Put soap on you finger so the caulk does not stick to it and smooth the caulk into the groove. After the caulk dries, trim the excess away with a utility knife.
This article is owned by True Value and was reprinted on this site with their permission.
Comments